- Tunisuino
- Introducing the Tunisuino
Introducing the Tunisuino
The tunisuino is a hand sized programming board. It lets you control a robot, drive a graphic display or even fly a drone. It is designed to control things. From flashing a simple LED light to driving a fairly complex electromechanical system, you just write some code in an easy to learn language and the board interfaces the connected sensors, motors and lights and drives them according to your instructions.
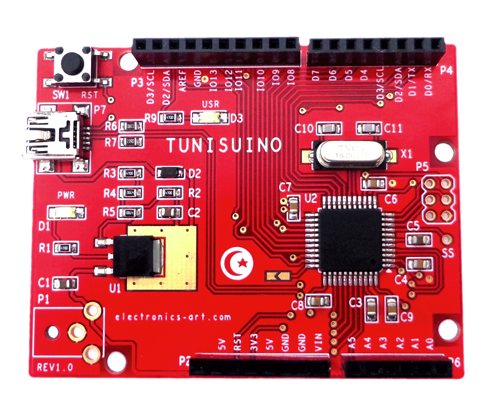
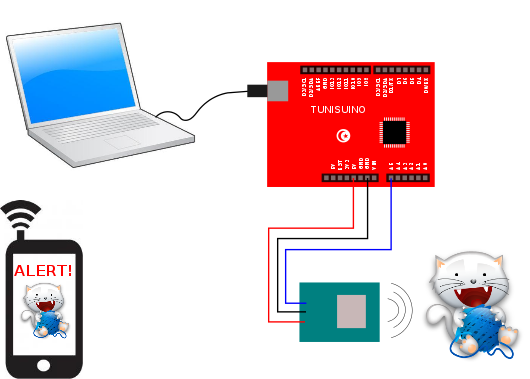
There are on the tunisuino around 20 pins where you could connect peripherals. You could connect simple items like leds and motors but also complex ones like a wifi transceiver, a smartphone or even an entire laptop. This way the tunisuino opens the door to a whole new range of applications. It lets you send emails when your cat trigger a motion sensor or water your garden remotely via internet or even building some automatic laser cutter machine. The applications are endless and are only limited by imagination.
The core of the tunisuino is an ATMEL microcontroller clocked at 16 MHz. It allows you to execute programs at a rate of 16 million instructions per second. This is highly sufficient to fly your drone, drive a graphic display or control your smarthome.
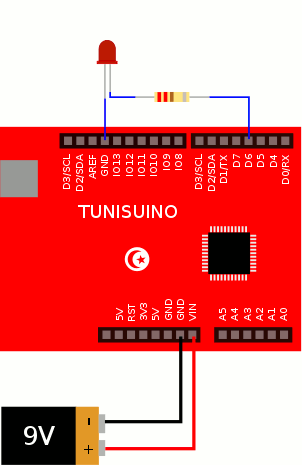
To program an ordinary microcontroller you need to be familiar with the processor architecture and know all the low level details behind its inner working. This is what most electronics engineers do for a living. With the tunisuino though, this is no longer the case. Anyone, no matter how little is his electronics background, is still able to write code, program the microcontroller and design things that really work in real life. As a matter of fact, in order to blink a light bulb you only need to connect a LED (a tiny light bulb) to pin D6 of the tunisuino connector and write the following code :
void setup() {
    pinMode(6, OUTPUT);
}


void loop() {
    digitalWrite(6, 1);
    delay(500);
    digitalWrite(6, 0);
    delay(500);
}
Every code for the tunisuino contains two sections :
1- Setup : this is what the tunisuino do once at power up or after a reset.
2- Loop : this contains the instructions that the microcontroller would execute endlessly (the main program)
For our 'Blink a led' program, we specify at the setup pin 6 as an output and then we keep turn the pin on and off in the main program with a delay in between. Note that when the processor reaches the end of the Loop section, it starts again from the first instruction in the Loop section. This way, the led keeps blinking forever.
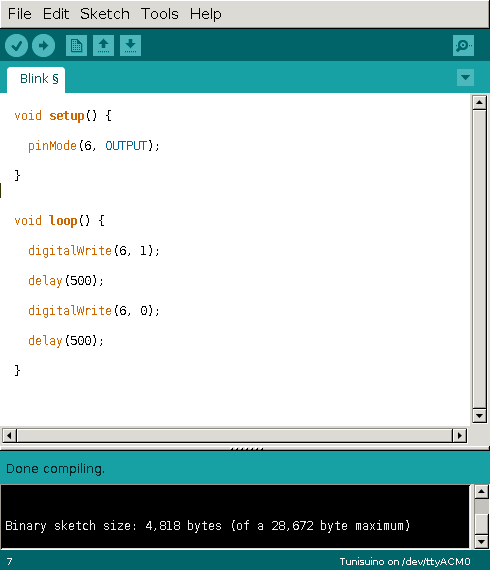
The code is entered in the IDE. This is a software that runs on your computer and lets you program the tunisuino. Once the code is written, you connect the tunisuino to the computer via a mini usb cable and click on the 'Upload' icon.
![]()
The program is transferred automatically to the board and saved in the flash memory inside the microcontroller. You have officially built your first light flasher.
Now you could replace the LED with a beeper to build a home alarm or a DC motor to move things around and experiment with different codes and algorithms to make exciting autonomous system and have fun along the way.